When it comes to securing web applications, the Open Web Application Security Project (OWASP) is a well-known organization that focuses on improving safety. A non-profit group that brings together security professionals, developers, and researchers to collaborate on enhancing web application security, OWASP has created several projects like the OWASP Top Ten, Juice Shop, and ASVS (Application Security Verification Standard), which promote best practices and improve overall application security. It offers various projects, tools, and resources to help organizations identify and fix vulnerabilities in their software. In this article, we'll specifically explore one powerful tool from OWASP called OWASP ZAP (Zed Attack Proxy). We will try to understand how ZAP works, perform scans, and seek to understand the results.
A versatile and robust security testing tool, OWASP ZAP helps security teams and developers identify vulnerabilities and strengthen the security of web services.
Understanding ZAP
In simple terms, OWASP ZAP is an open-source security testing tool that looks for vulnerabilities in web apps.
But how does it actually work?
ZAP has two main ways of doing its job: passive and active scanning. In passive scanning, it evaluates the communication between your web browser and the server. It analyzes the data being transferred, checking if there are any security issues like missing security headers or leakage of sensitive information. This is done without actively attacking the app, so it’s like watching quietly from the sidelines.
On the other hand, active scanning is a bit more aggressive. In this mode, ZAP actively sends attack payloads to the app to see if it can find vulnerabilities. It tries various techniques like cross-site scripting (XSS) or SQL injection to see if the service is exposed to those types of attacks. It’s worth mentioning that it won’t really harm your app, but only tries to simulate what a real attacker might do.
Overall, ZAP is a handy tool that helps you find security holes in your web app. It’s almost like having a smart assistant that looks for vulnerabilities and gives you insights on how to fix them. So, now let's get our hands dirty and look at how the scans can be run.
How Tests Are Made
Now that we understand the basics of OWASP ZAP, let's dive into how tests are conducted on it. You can do that with automated scans, manual exploration, or a mix of the two.
Automated Scans
One of the easiest ways to have satisfactory scans right off the bat is to use ZAP’s automated scan feature. With just a few clicks, you can start a scan and let ZAP do its thing. It will crawl through your app, trying to find paths, routes, and common security weaknesses like cross-site scripting (XSS) or SQL injection. You can also increase efficacy by importing, for instance, an OpenAPI/Swagger definition file (so that ZAP gains knowledge of every route) and then running an active scan – the more aggressive attack – later. Once the scan is complete, it generates a comprehensive report with details on any vulnerabilities detected and their severity levels.
Manual Explore
If you're more into hands-on testing, ZAP has you covered. You can use it as a proxy, which means it sits between your browser and the web server, capturing and analyzing the traffic. You can manually explore your app and interact with different pages while ZAP observes everything in the background. As you navigate through the app, the proxy will actively record the requests and responses, giving you valuable insights into potential security issues. In this mode of attack, there is also a feature called HUD, which is an overlay that can be activated to assist you. It can, for example, run an active scan in real-time, while you’re navigating the app.
Authentication
For applications that don’t require authentication or that have several unprotected services, automated scans could produce good results. However, if most parts of the app are protected, ZAP may need to handle authentication before sending requests to the service. This problem can be mitigated through manual exploration which allows you to log in and enter your credentials. However, if you are looking for a more automated process, this could prove to be a significant bottleneck.
ZAP supports some authentication strategies out of the box, like form-based (the one used on manual explorations) and JSON-based. None of them, however, support nor handle a very common method nowadays, that is, token-based, so we need to do that ourselves. To accomplish that, ZAP provides a script-based strategy, which gives us the possibility to write custom scripts to handle stuff like user validation and access tokens.
So, the logic consists of two scripts, one in the “Authentication” category, which will send the request to the login route and receive the token, and the other in the “HTTP Sender” type, which will add the “Authorization” header to appropriate requests. Let’s see how to create scripts:
- Go to the Scripts tab

2. Create the Authentication script
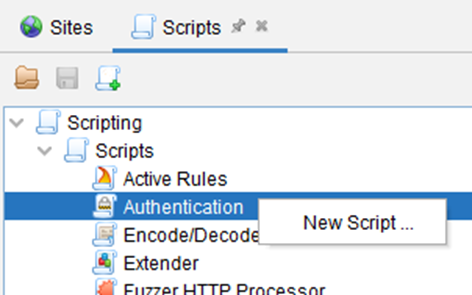
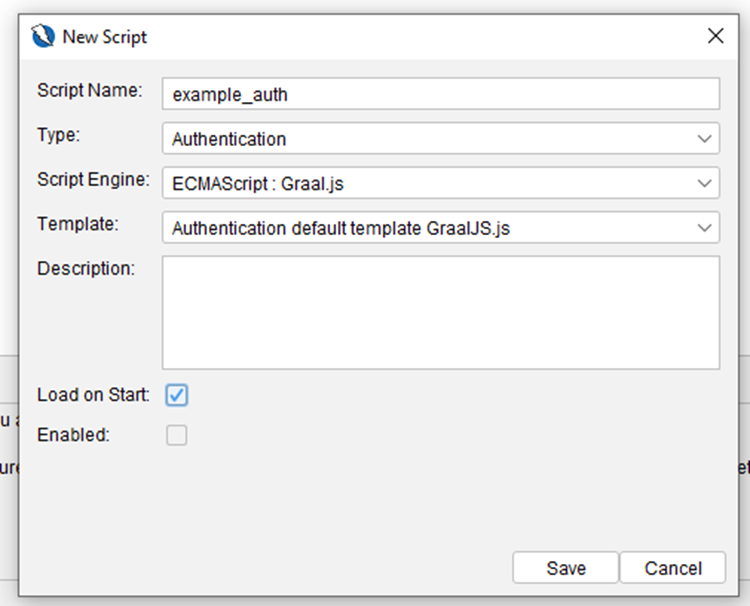
3. The script should be something like this:
const HttpRequestHeader = Java.type(
'org.parosproxy.paros.network.HttpRequestHeader'
);

const HttpHeader = Java.type('org.parosproxy.paros.network.HttpHeader');

const URI = Java.type('org.apache.commons.httpclient.URI');

const ScriptVars = Java.type('org.zaproxy.zap.extension.script.ScriptVars');

function authenticate(helper, paramsValues, credentials) {

print('Authenticating via JavaScript script...');

const loginUri = new URI(paramsValues.get('loginUrl'), false);

const req = helper.prepareMessage();

req.setRequestHeader(
   new HttpRequestHeader(
     HttpRequestHeader.POST,
     loginUri,
     HttpHeader.HTTP11
   )

);

req
   .getRequestHeader()
   .setHeader(HttpHeader.CONTENT_TYPE, HttpHeader.JSON_CONTENT_TYPE);

// builds the request body with appropriate field names and credentials

const body = JSON.stringify({
   [paramsValues.get('usernameFieldName') || 'username']:
     credentials.getParam('username'),
   [paramsValues.get('passwordFieldName') || 'password']:
     credentials.getParam('password'),
});

req.setRequestBody(body);

req.getRequestHeader().setContentLength(req.getRequestBody().length());

helper.sendAndReceive(req);

const res = JSON.parse(req.getResponseBody());
const token = res['access'];

if (token) {
   // sets a global variable that all scripts can access
   ScriptVars.setGlobalVar('accessToken', token);
   print('Auth script finished successfully');
} else {
   print('Error getting access token');
}

return req;

}
Also, it’s important to define the required and optional parameters, as well as the logged-in/out indicators regex, so that ZAP knows when it is authenticated or not. This should be done in the same file.
function getRequiredParamsNames() {
return ['loginUrl'];
}

function getOptionalParamsNames() {
return ['usernameFieldName', 'passwordFieldName'];
}

function getCredentialsParamsNames() {
return ['username', 'password'];
}

function getLoggedInIndicator() {
return '';
}

function getLoggedOutIndicator() {
return '(token_not_valid|Unauthorized)';
}

return req;
}
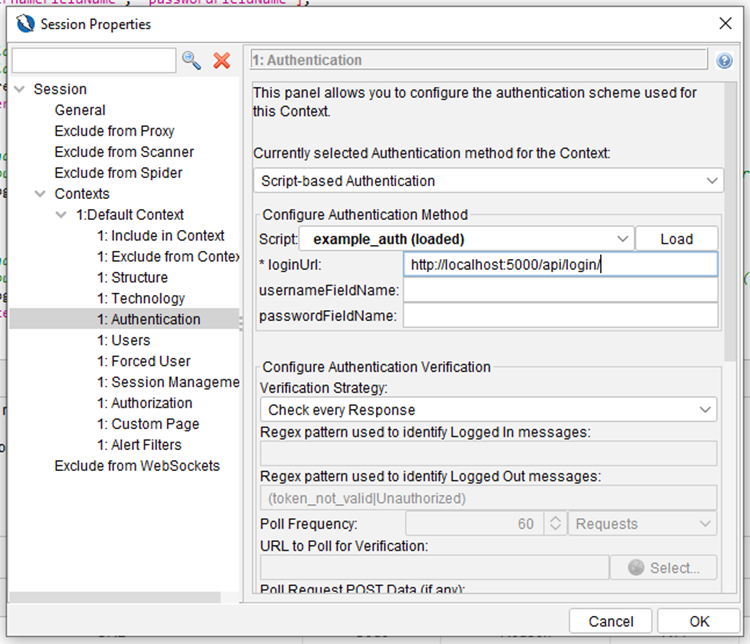
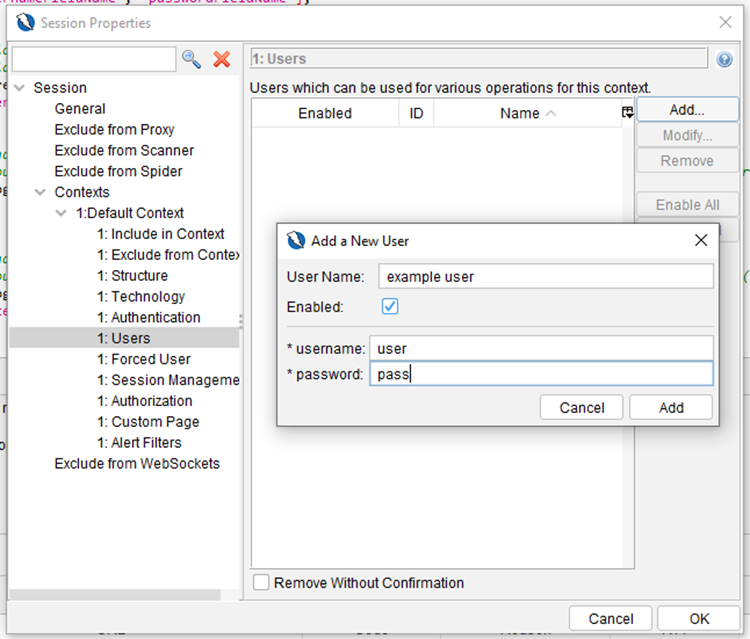
Now, we have to load the script to the current ZAP context, and specify the required parameters, like the login URL and the credentials itself. This is done via the ZAP UI, as shown below:
- Double-click the current context, then go to the Authentication tab:
2. Go to the Users tab and create a new user, with valid credentials for your app:
3. When running the active scan, make sure to select the created user to be used by the auth script:
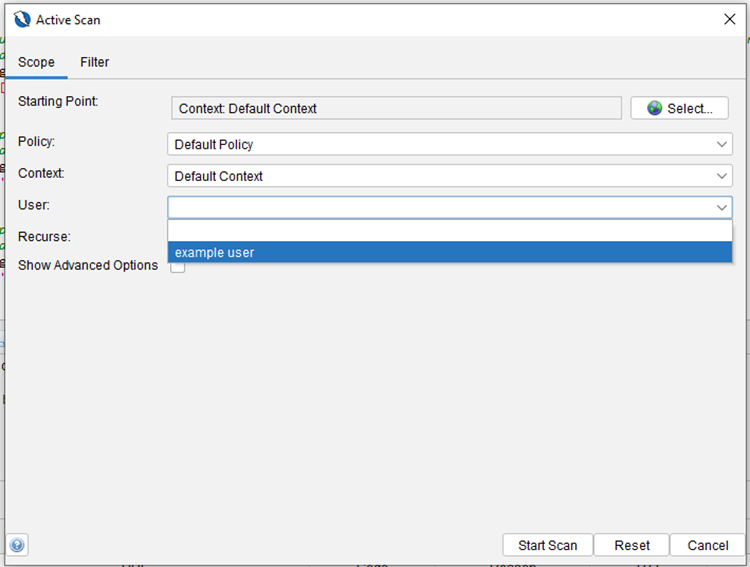
Finally, we must send the received token along with the requests, so let us look at our HTTP Sender script:
- Create the script under the HTTP Sender category. Do not forget to check the Enabled box, otherwise, the script will not be run by ZAP. You can also enable it later by right-clicking it in the scripts list
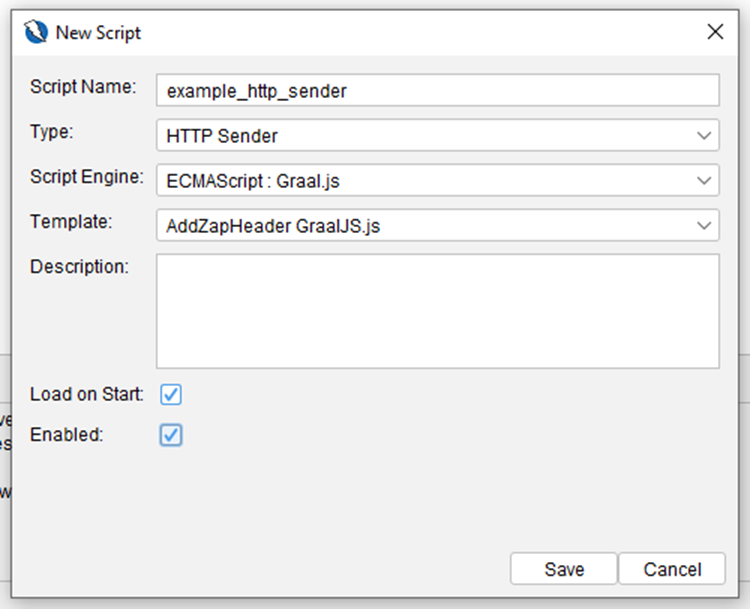
- The script should look like this:
const HttpSender = Java.type('org.parosproxy.paros.network.HttpSender');

const ScriptVars = Java.type(
'org.zaproxy.zap.extension.script.ScriptVars'
);

function sendingRequest(msg, initiator, helper) {
// adds the Authorization header to all requests in scope except the
// login request itself
if (
   initiator !== HttpSender.AUTHENTICATION_INITIATOR &&
   msg.isInScope()
) {
   msg
     .getRequestHeader()
     .setHeader(
       'Authorization',
       `Bearer ${ScriptVars.getGlobalVar('accessToken')}`
     );
}
}
You can find a bunch of useful examples of ZAP scripts in this repository. The scripts above were created with the help of the samples provided there.
How to Check Results
There are two main ways to check your scan results. While the attack is happening, and vulnerabilities are being found, ZAP lists them in the Alerts tab. Each alert is classified as low, medium, high, or informational priority, with yellow, orange, red, and blue flags. Also, at the end of the scan, you can choose to generate a report, which consists of an HTML file where the results are displayed attractively with graphs, tables, etc.
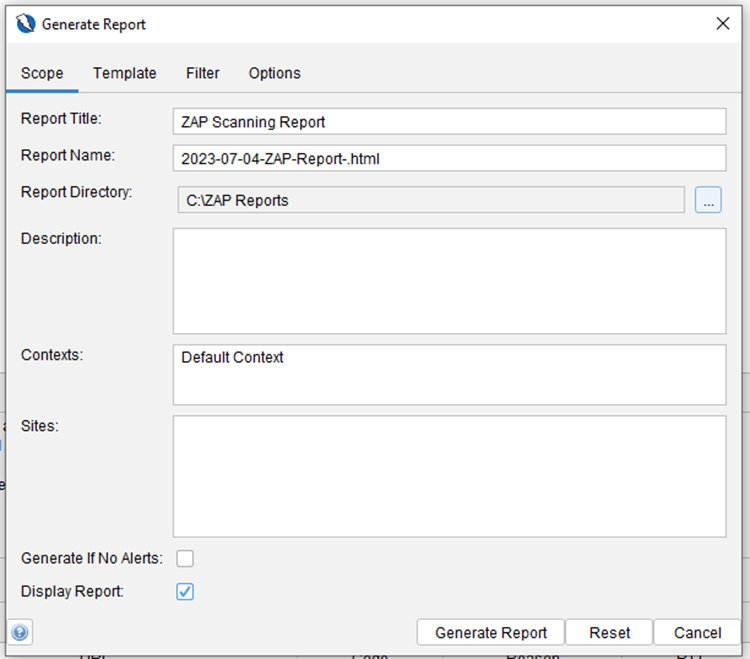
Each vulnerability in the report comes with detailed information to help understand the issue at hand. You will find valuable insights on the impact of the alert and recommended steps to mitigate the risk. ZAP even provides external references and resources to further enhance your understanding of the vulnerability and its potential consequences.
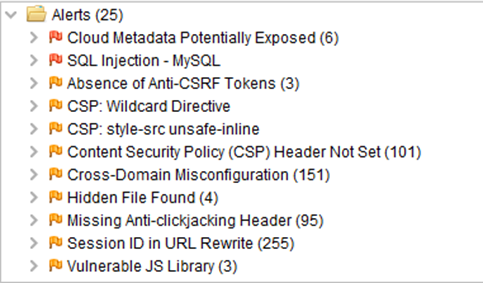
Here are some examples of scan results from Juice Shop – a sample app from OWASP that has struggled with flaws and hacking challenges. It is made to be a secure playground.
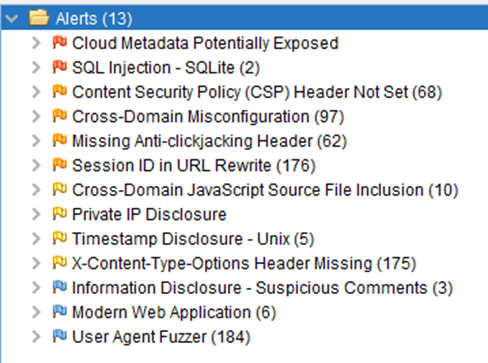
Those were the alerts from an automated scan on Juice Shop. Ten vulnerabilities were found by just crawling and sending malicious requests to the app. Now, let us see the results from a manual exploration with the help of the ZAP HUD:
As you can see, the coverage is much better, especially because manual exploration allows you to login and have access to protected pages and routes. Another technique tested was to manually explore the app and then run an active scan on the paths discovered by the exploration. The results were very good, with considerable coverage as well.
So, it is notable that adopting ZAP during the Software Development Lifecycle (SDLC) can immediately improve security. The results are clear and objective, especially when describing the problem and its viable solutions.
Key Takeaways
Wrapping up, we have explored OWASP ZAP and its role in increasing application security. Here are some standing points:
- OWASP ZAP, offered by the Open Web Application Security Project (OWASP), is a powerful tool designed to identify vulnerabilities in web applications.
- It operates through passive and active scanning techniques, allowing us to detect security weaknesses without harming the application.
- The tool offers user-friendly features, enabling both automated scans and manual exploration for comprehensive testing.
- ZAP's scan results provide detailed reports, categorizing vulnerabilities based on their severity levels and offering recommended actions for mitigation.
- Interpreting the scan results allows you to prioritize and address vulnerabilities, enhancing your application's security posture.
- ZAP helps handle authentication through scripting and other methods, facilitating testing of secured areas within your web application.
- Using the tool as part of your security practices helps identify and mitigate vulnerabilities before they can be exploited.
By leveraging the power of OWASP ZAP, it is possible to proactively enhance the security of your projects, safeguarding them against potential threats. So, with these things in mind, we hope you can strengthen the security and reliability of your web apps.
Acknowledgement
This piece was written by Vinicius Assis Lima, software developer at Encora. Thanks to João Caleffi for reviews and insights.
About Encora
Fast-growing tech companies partner with Encora to outsource product development and drive growth. Contact us to learn more about our software engineering capabilities.