Unlock the Power of AutoML with Google's Vertex AI: Revolutionize Your Machine Learning Projects
In the realm of machine learning, the ability to harness the potential of AI without a deep background in data science or coding is a game-changer. Google's Vertex AI, equipped with AutoML (Automated Machine Learning) capabilities, is a powerful tool that puts the power of machine learning in the hands of non-experts. In this blog post, we'll delve into the features, advantages, and key takeaways of using AutoML from Google's Vertex AI, shedding light on how it can revolutionize your Machine Learning endeavors.
AutoML Features
AutoML Vision: If your projects involve image data, AutoML Vision is your go-to feature. It simplifies object detection, sentiment analysis, and custom image classification, making it indispensable for industries like healthcare, retail, and manufacturing.
AutoML Natural Language: Unleash the power of natural language understanding with AutoML Natural Language. Analyze text data, categorize content, and create chatbots effortlessly, making it ideal for customer support, content analysis, and beyond.
AutoML Tables: For those working with tabular data, AutoML Tables simplifies predictive modeling, anomaly detection, and classification. Use it for tasks such as financial forecasting, fraud detection, and inventory management.
Advantages
Effortless Model Building: Vertex AI's AutoML eliminates the need for extensive machine learning expertise. With a user-friendly interface and intuitive workflows, you can create high-quality models without writing complex code.
Wide Range of Use Cases: Whether you're interested in image classification, natural language processing, or tabular data analysis, Vertex AI's AutoML offers a diverse set of tools and pre-built models to suit various applications.
Time and Cost Efficiency: Building and fine-tuning machine learning models can be time-consuming and resource-intensive. AutoML automates many of these processes, significantly reducing development time and associated costs.
Model Monitoring and Management: Vertex AI doesn't stop at model creation. It offers robust monitoring and management tools to ensure that your machine learning models continue to perform optimally, even as data evolves.
Scalability: Whether you're a startup or a large enterprise, Vertex AI can scale with your needs. It seamlessly integrates with Google Cloud, making it easy to deploy models in production environments.
Security and Compliance: Google Cloud's security and compliance standards are world-class. With Vertex AI, you can benefit from these same high levels of security to protect your data and models.
Case Study: Predicting Cardiovascular Disease Patients with AutoML in Google's Vertex AI
Set Up Your Environment
Ensure you have access to Google's Vertex AI platform. You can sign up for a Google Cloud account and enable Vertex AI services.
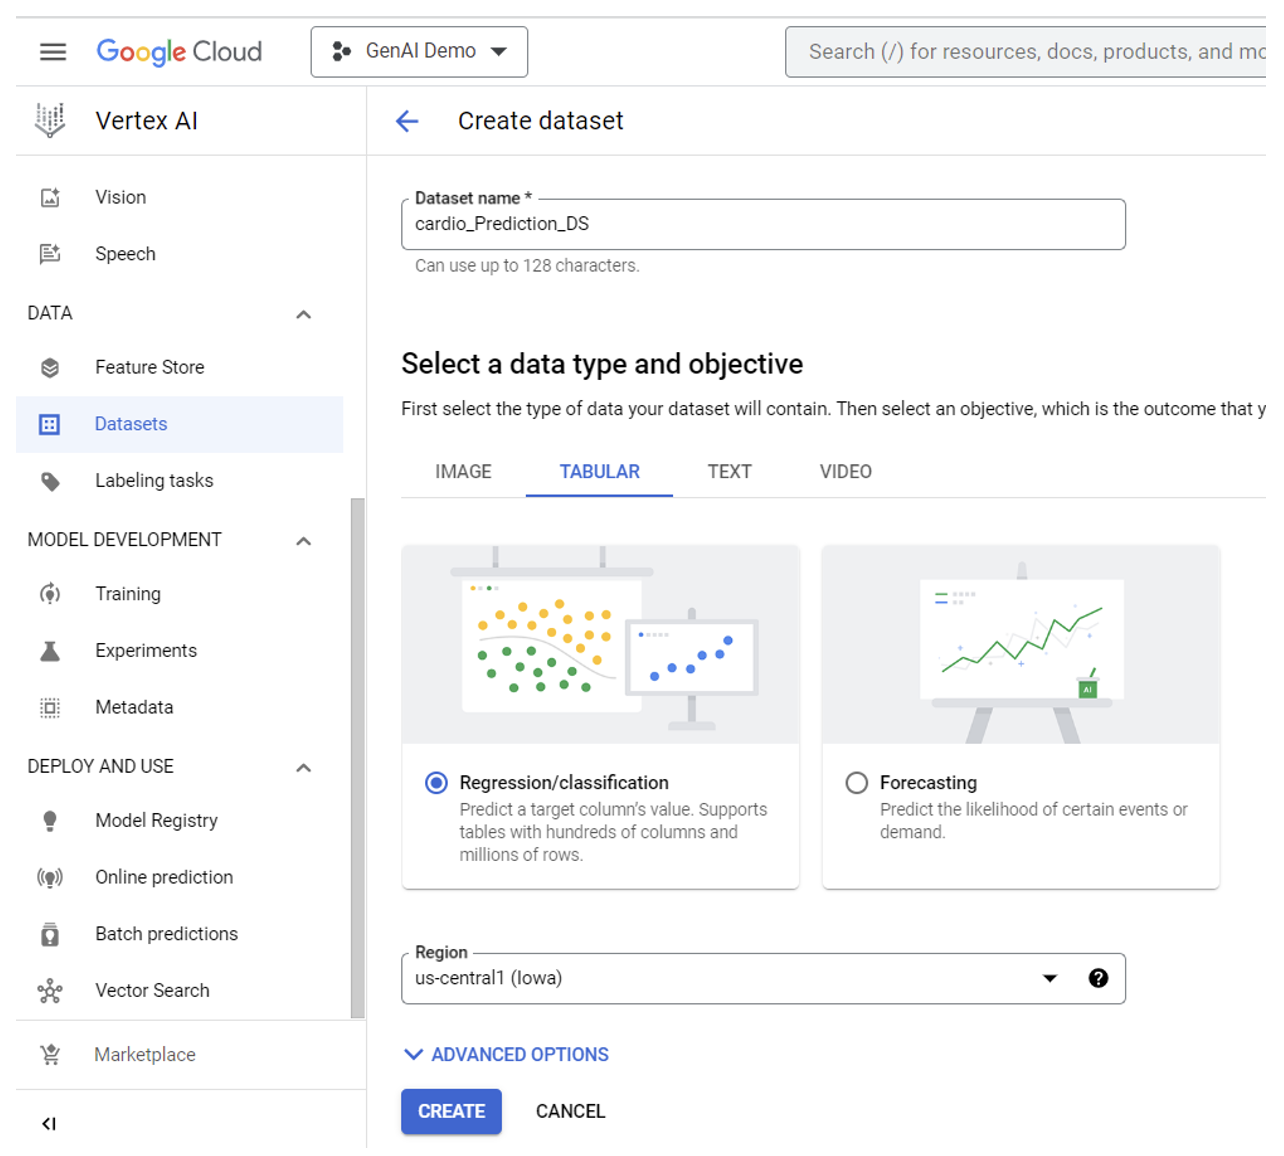
Create Dataset
Login to the Studio and under the Data section, choose Datasets. On the right side, provide the Dataset Name and then select a data type (here we have selected Tabular) and choose a different location or leave the default one and press the Create button.
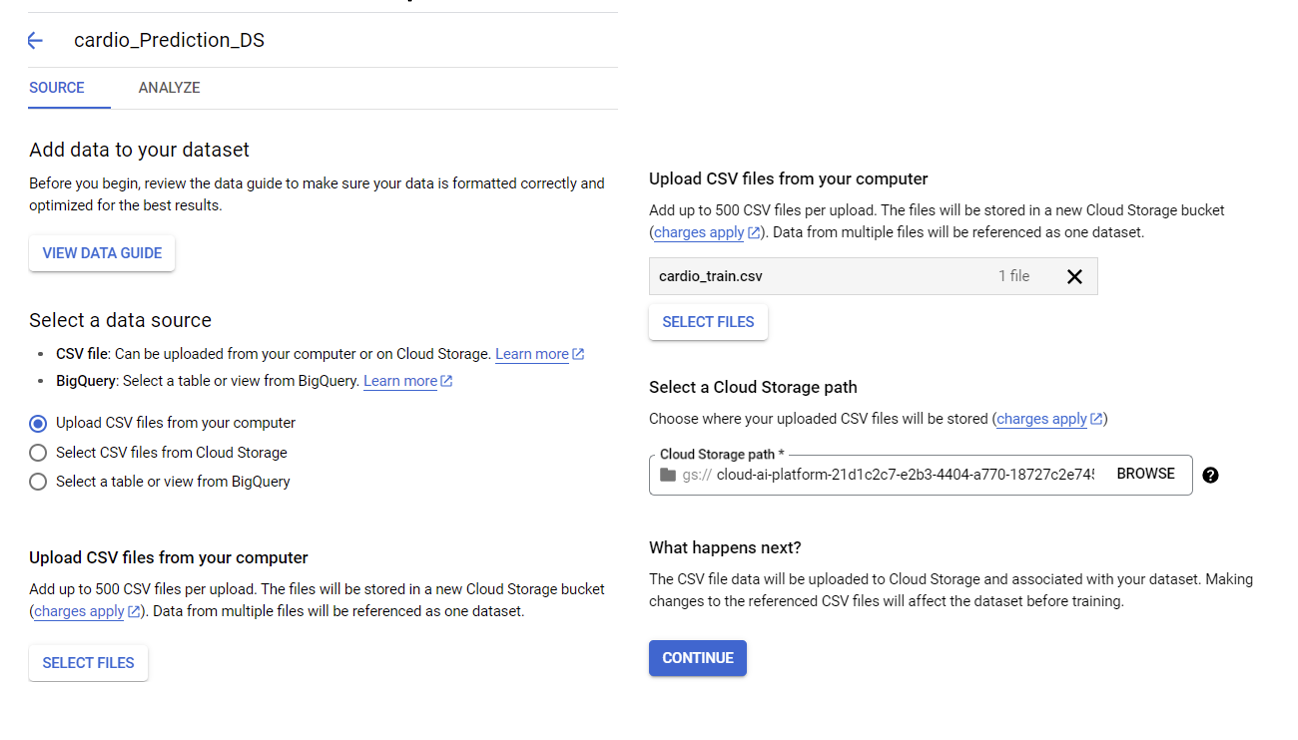
Select a data source from the below three options. We have chosen the first option to upload from the local computer.
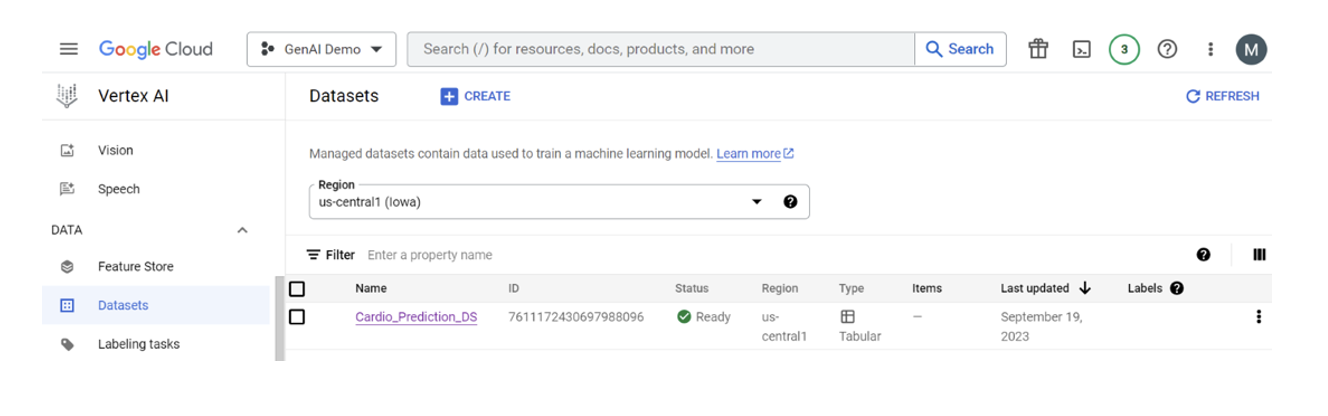
Going back to the Datasets dashboard will display the registered dataset(s).
Train Model with AutoML
On The Vertex AI console, select Training:
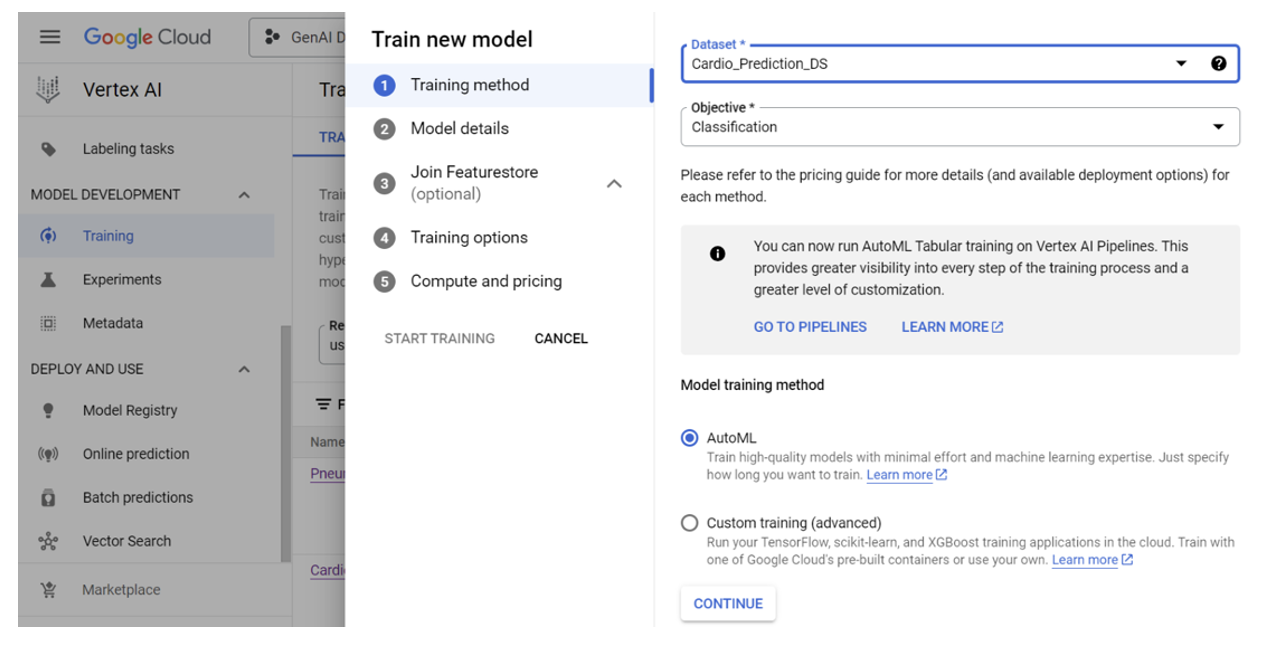
1. Next to Training (near the top), select CREATE
For Dataset select the dataset created “Cardio_Prediction_DS"
For Objective make sure Classification is selected and use AutoML for the method
Click CONTINUE
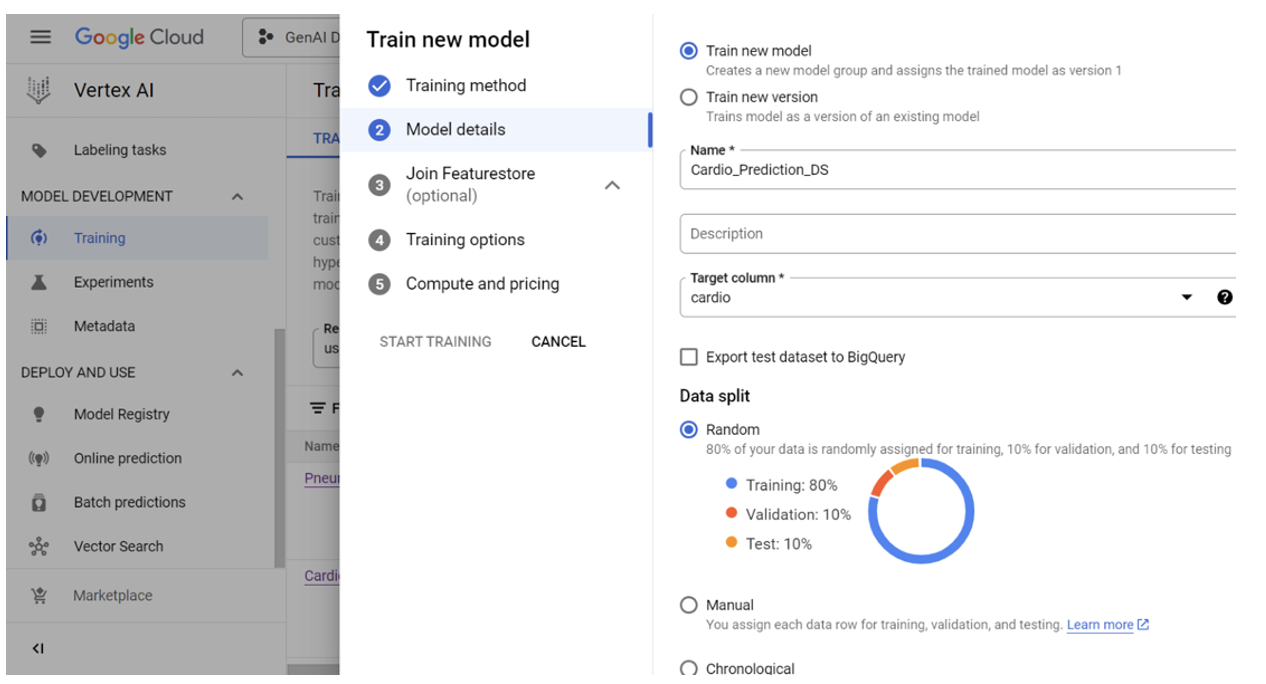
2. For Model Details:
Keep the default Model name.
For the Target column select the column to train predictions (Choosing the 'Cardio' column, where '1' signifies the presence of cardiovascular disease and '0' represents its absence)
Expand ADVANCED OPTIONS:
Select Random for the Data split method and Click CONTINUE
3. Join Feature store is Optional (let’s skip it for this case study)
4. For Training options:
Click the - symbol next to any rows for variables that should be excluded from training, like the id, and Click CONTINUE
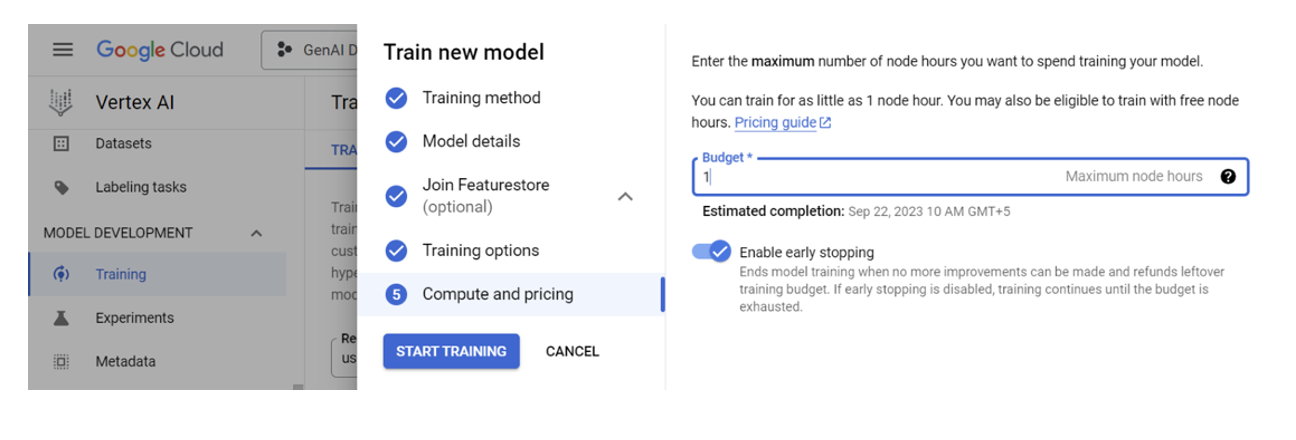
5. For Compute and pricing:
Enter a Budget of 1 node hour.
Make sure Enable early stopping is toggled on.
Click START TRAINING
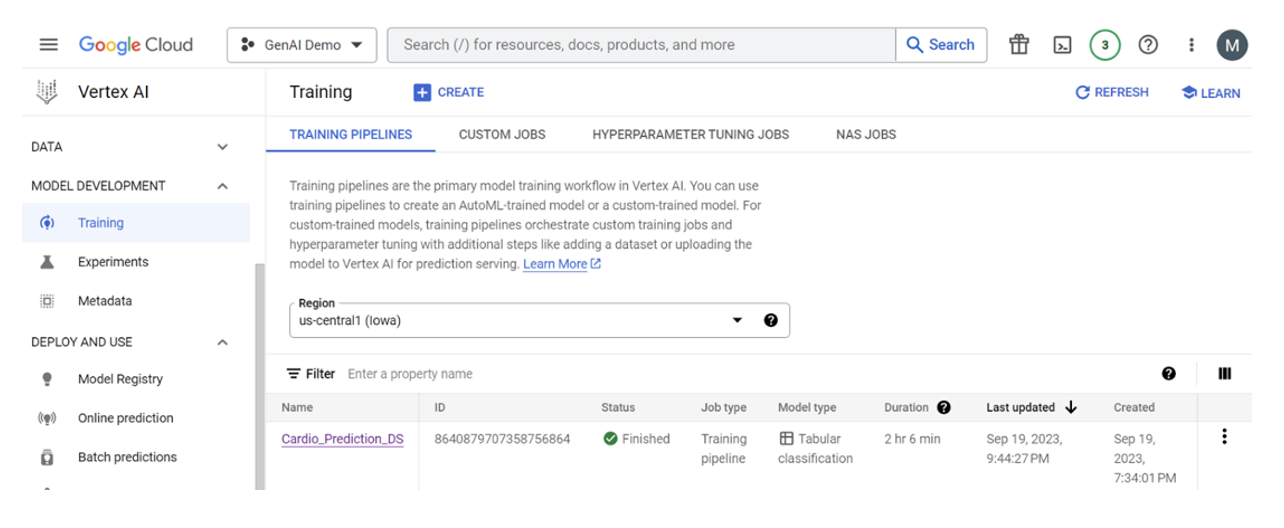
Return to the Vertex AI console Training Menu:
Once the model completes training the name will be accompanied by a green check mark (The duration of the training process typically depends on the dataset. In the case of this model, it required 2 hours and 6 minutes to complete the training.)
Model: Evaluate, Select, Deploy
On the Vertex AI console, select Models
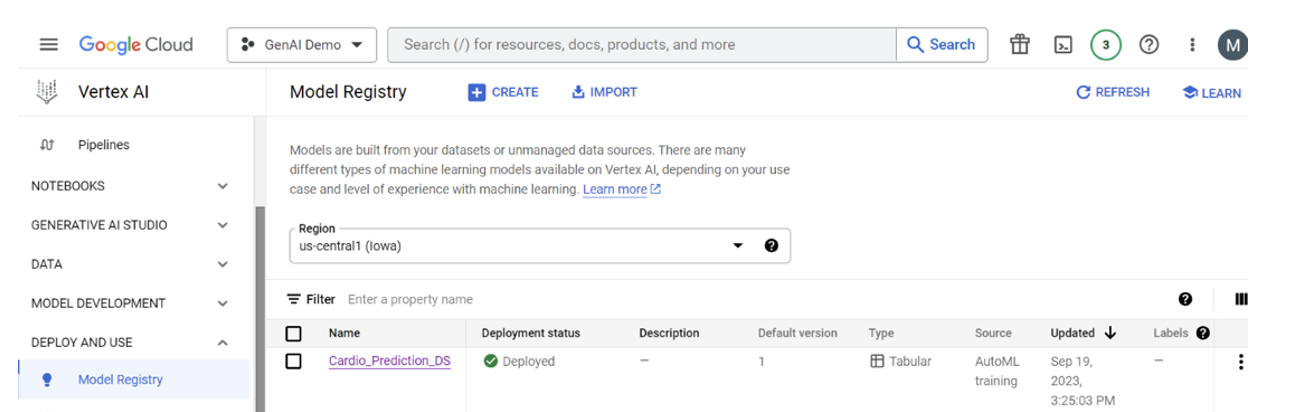
Select the model that was just trained.
This brings up the EVALUATE tab for the model
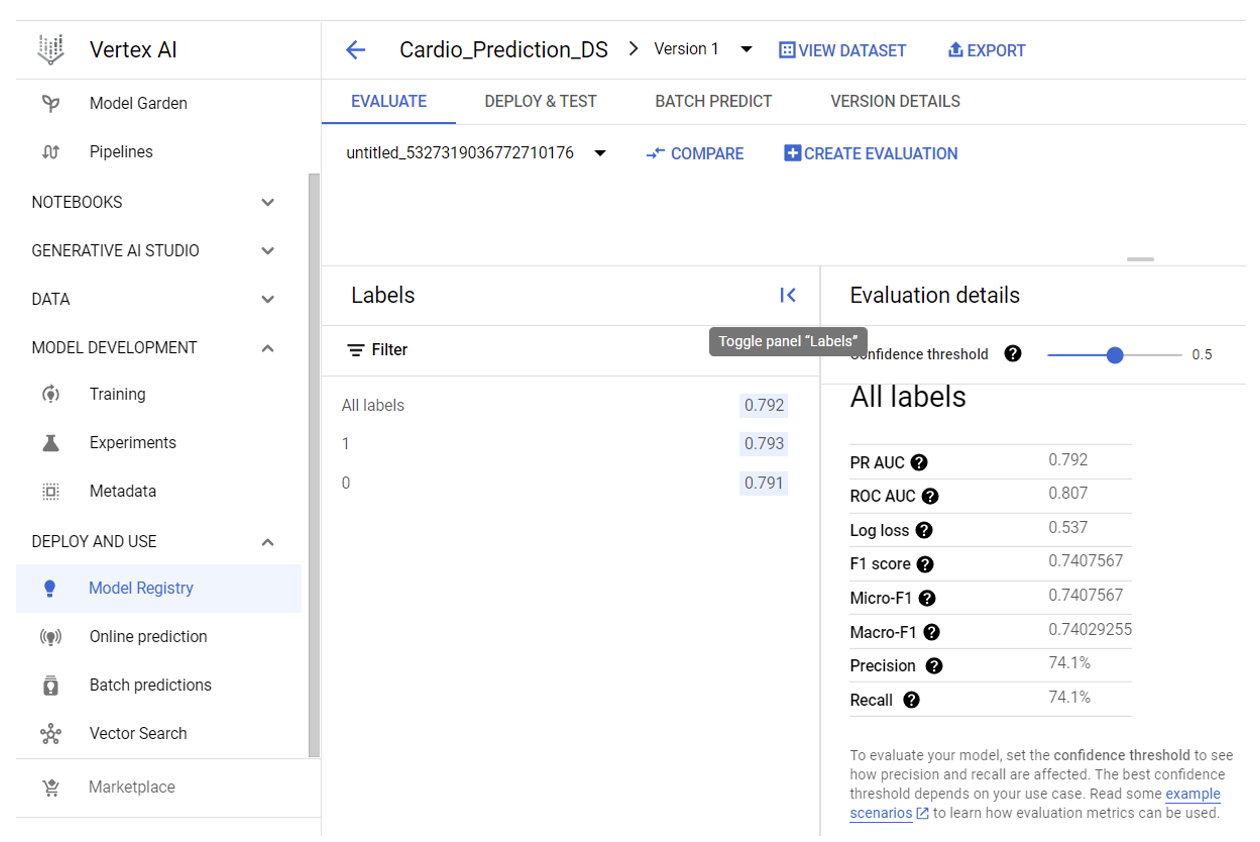
Select the tab labeled DEPLOY & TEST:
Endpoint
While still on the Vetex AI Models section with the DEPLOY & TEST tab selected:
select DEPLOY TO ENDPOINT
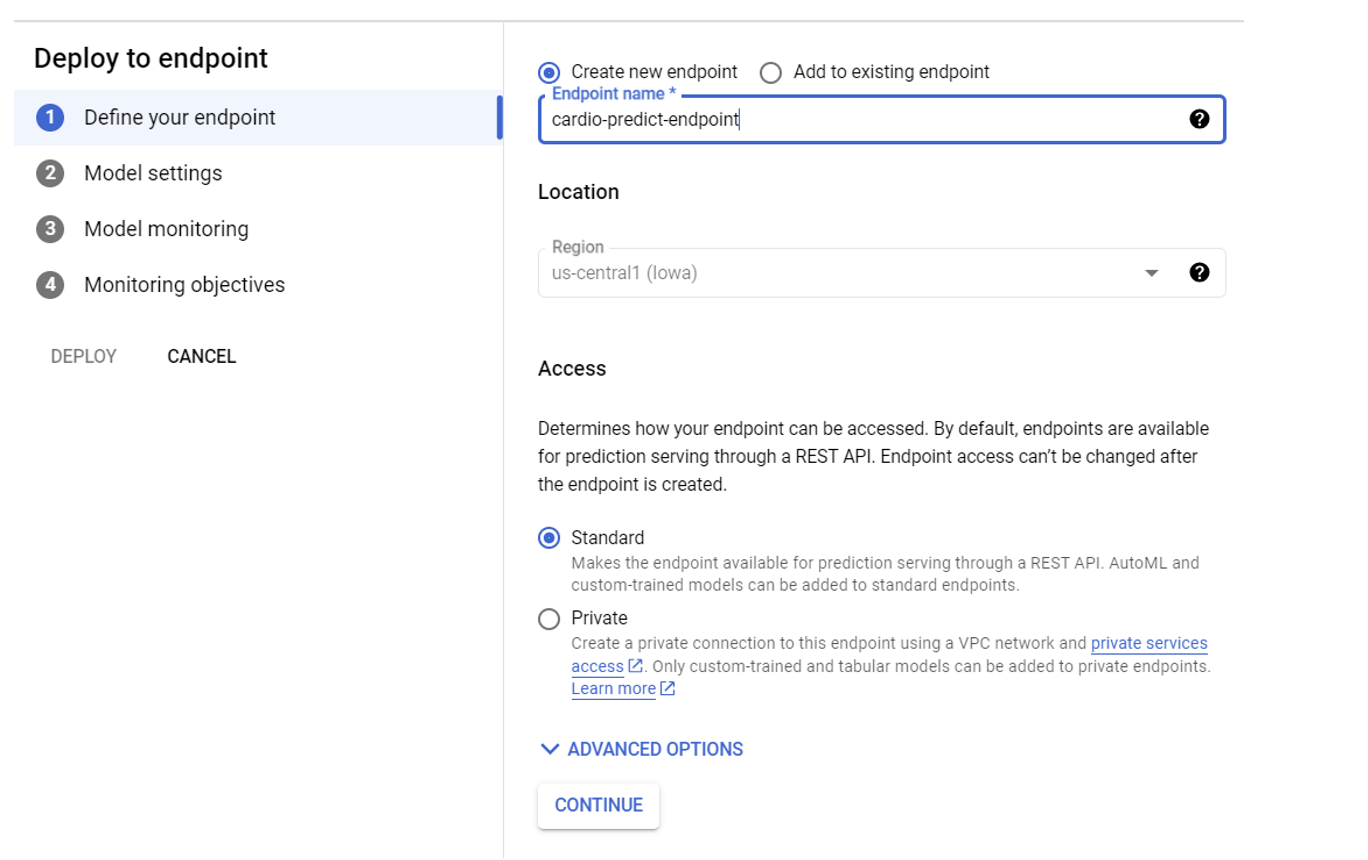
In the Deploy to Endpoint menus, complete Define your endpoint:
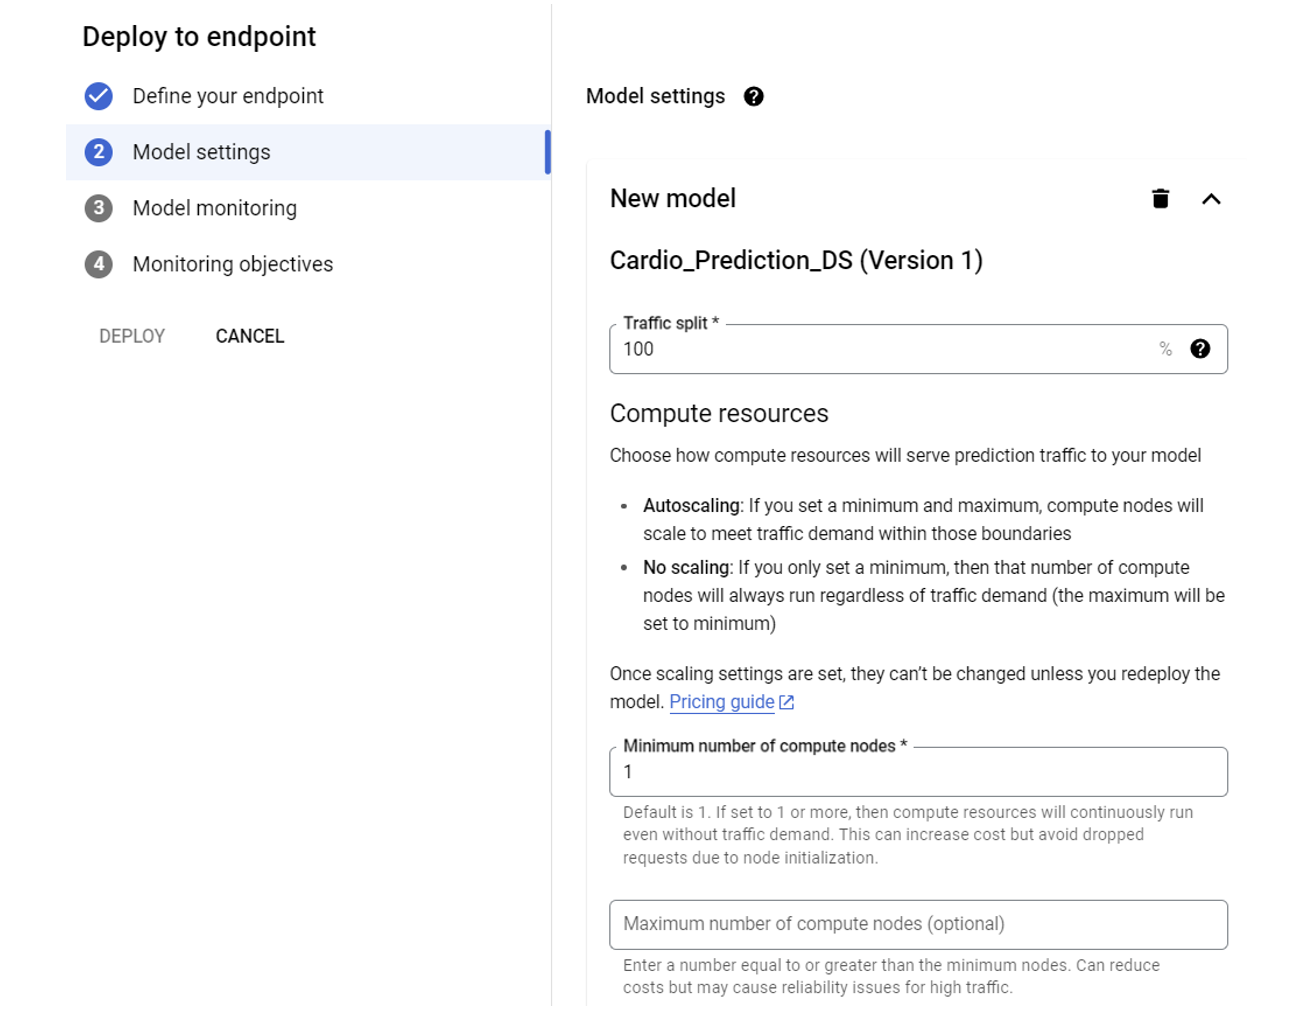
In the Model settings section:
The traffic split should be 100
The minimum number of computed nodes is 1
Keep the remaining default values for max nodes, scaling, logging, and explainability
Select CONTINUE
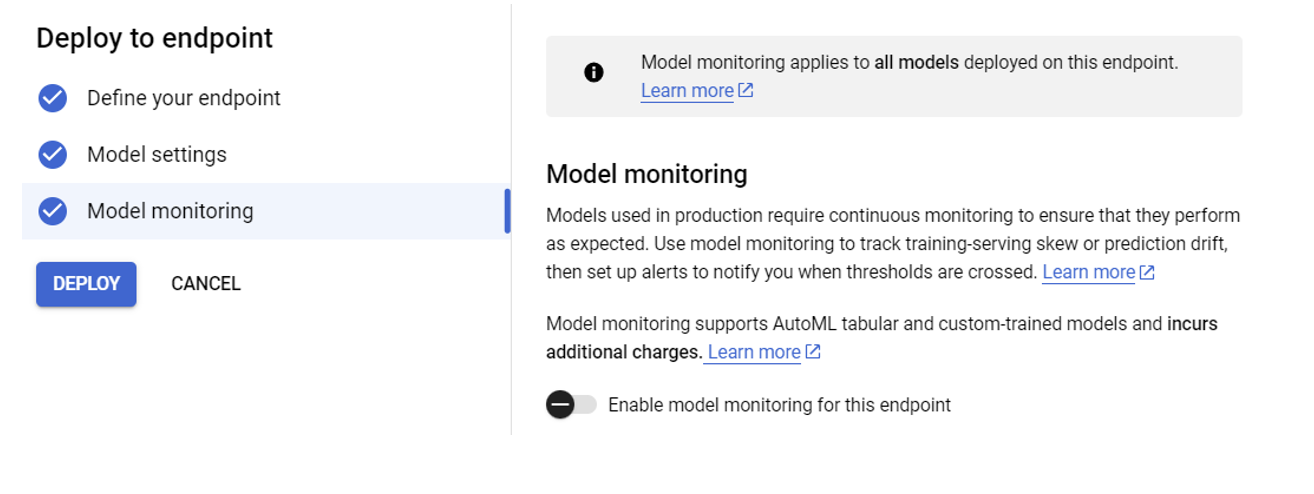
In the Model monitoring section:
Toggle disable model monitoring for this endpoint
Select CONTINUE
Once the model is deployed, click the endpoint and then click DEPLOY & TEST tab.
Here you can test your model.
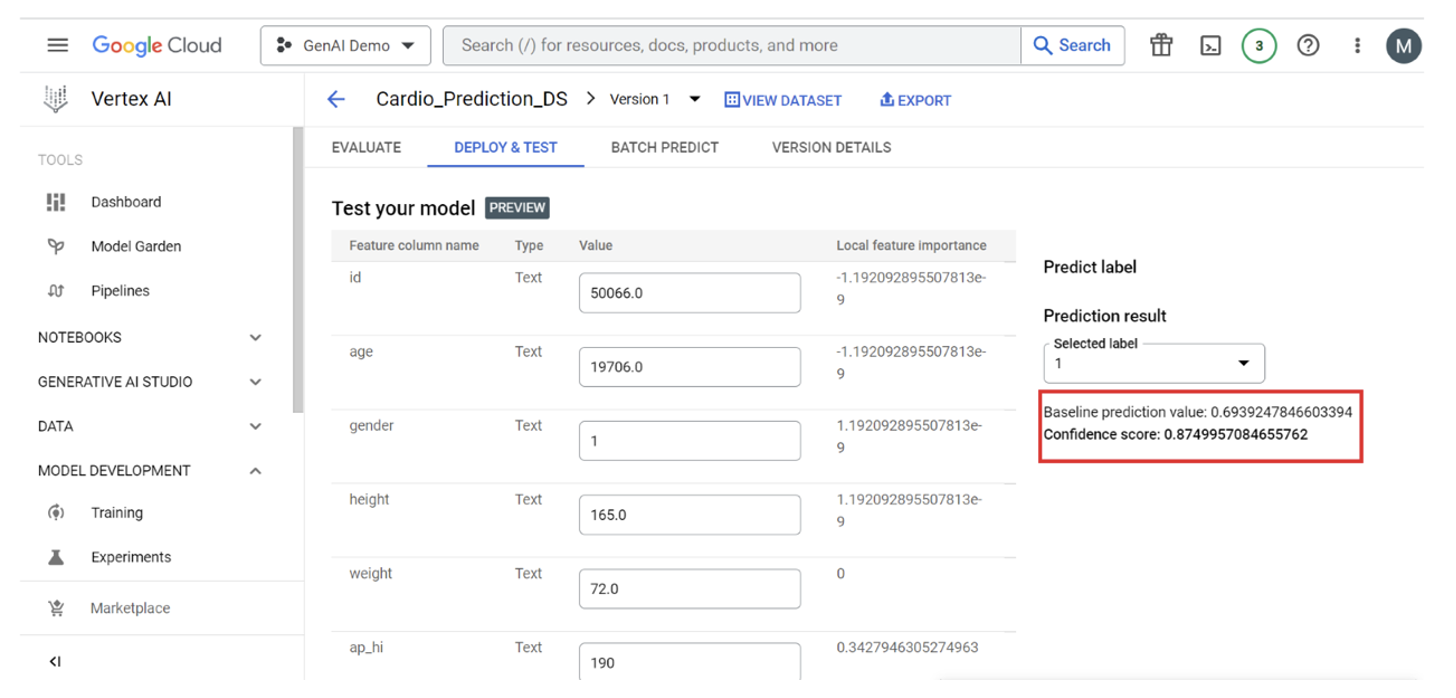
The above test data prediction result 1 indicates that the patient has cardio disease with a probability of approximately 0.69, while the confidence score of 0.875 indicates the model's high level of certainty in its prediction.
There are two ways to consume this service from your application.
REST
You can now execute queries using the command line interface (CLI).
1. Make sure you have the Google Cloud SDK installed.
2. Run the following command to authenticate with your Google account.
$ gcloud auth application-default login
3. Create a JSON object to hold your data.
{
"instances": [
{ "instance_key_1": "value", ... }, ...
],
"parameters": { "parameter_key_1": "value", ... }, ...
}
4. Create environment variables to hold your endpoint and project IDs, as well as your JSON object.
$ ENDPOINT_ID="XXXXXXXXXXXXXXX"
PROJECT_ID="XXXXXXXXXXX"
INPUT_DATA_FILE="INPUT-JSON"
5. Execute the request.
$ curl \
-X POST \
-H "Authorization: Bearer $(gcloud auth print-access-token)" \
-H "Content-Type: application/json" \
https://us-central1-aiplatform.googleapis.com/v1/projects/${PROJECT\_ID}/locations/us-central1/endpoints/${ENDPOINT\_ID}:predict \
-d "@${INPUT_DATA_FILE}"
Python
After the deployment of the model, the process of disease prediction can be initiated using Python code in conjunction with Google's AI Platform library. Presented below is a comprehensive code sample for reference.
In order to establish connectivity with Google Cloud Platform (GCP) through Python scripts within your code, it is imperative to follow the ensuing steps for acquiring the requisite JSON key
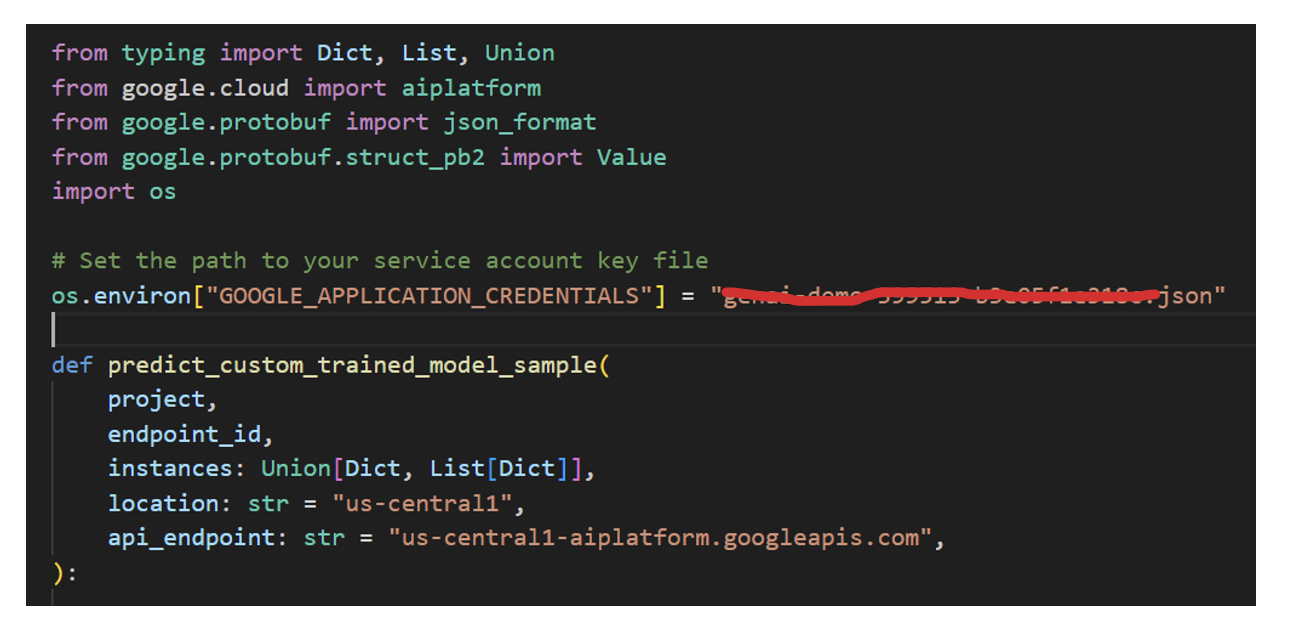
Step 1:
Imports the necessary modules and packages
Download the Service Account key file and set the environment vairable
(i) In the Google Cloud console, go to Menu menu > IAM & Admin > Service Accounts. Go to Service Accounts.
(ii) Select your service account.
(iii) Click Keys > Add key > Create new key.
(iv) Select JSON, then click Create and Download the JSON file
(v) Click Close.
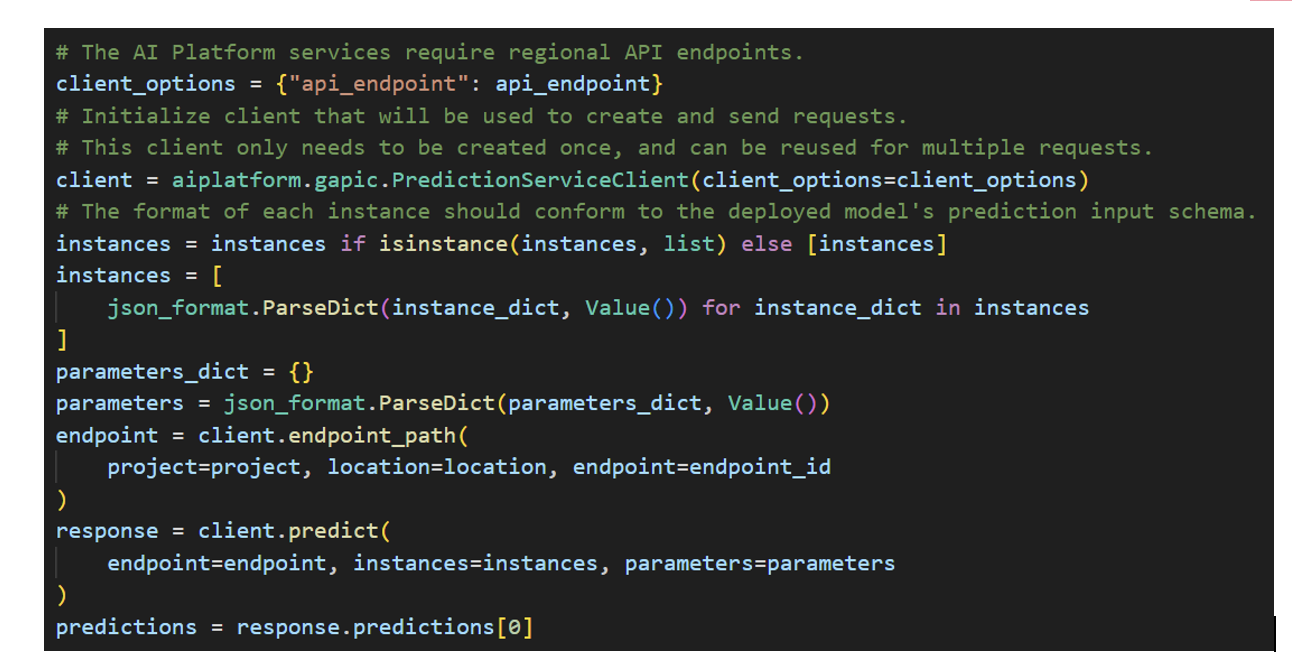
Step 2:
Initialize the client for the AI Platform Prediction service
prepare the input data (instances) to match the prediction input schema of the deployed model.
Send a prediction request to the deployed model using the client.predict method.
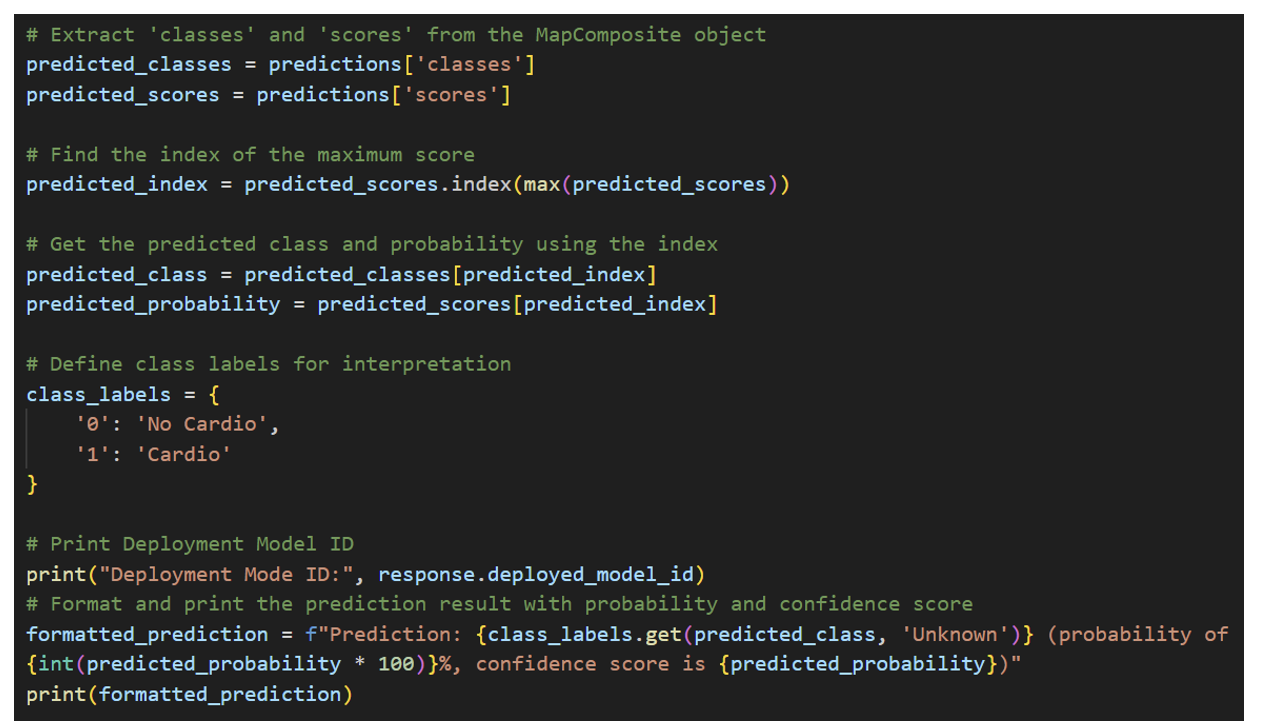
Step 3:
Find the index of the class with the maximum score
Print the prediction result, including the predicted class, probability, and confidence score
Step 4:
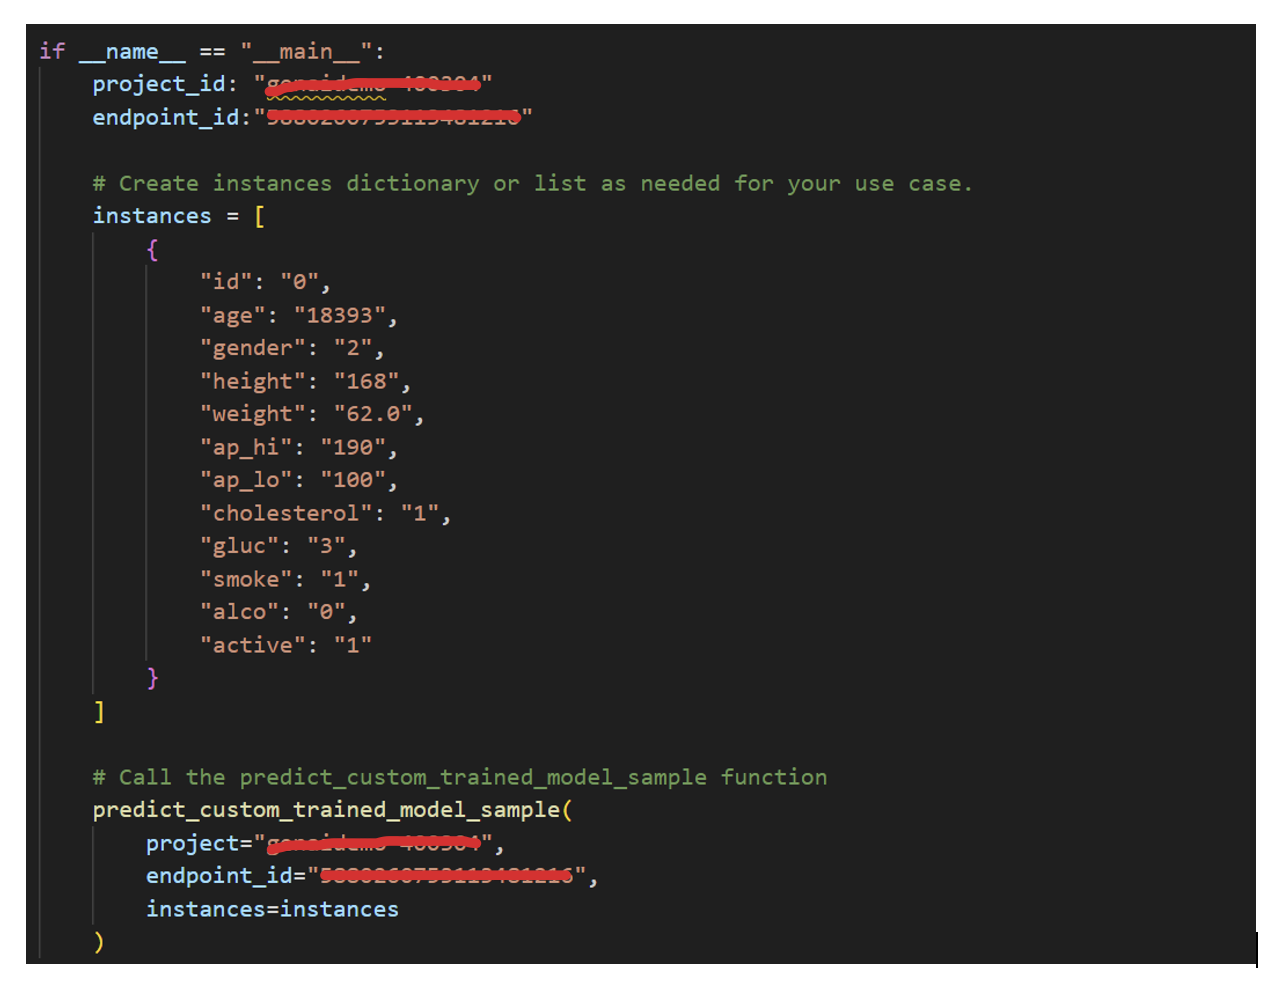
In the main block of the script, define the project ID and endpoint ID variables
Create an instances list with the input data to be used for prediction
Finally call the predict_custom_trained_model_sample function to make predictions using the specified inputs
Output

Key Takeaways
Google's Vertex AI with AutoML is a groundbreaking tool that democratizes machine learning. Whether you're an experienced data scientist or a newcomer to AI, AutoML empowers you to harness the full potential of machine learning with ease.
With Google’s Vertex AI, you get:
Effortless Model Building
Wide Range of Use Cases
Time and Cost Efficiency
Model Monitoring and Management
Scalability
Security and Compliance
Community and Support
About Encora:
Encora specializes in providing software engineering services with a Nearshore advantage especially well-suited to established and start-up software companies, and industries. We have been headquartered in Silicon Valley for over 20 years, and have engineering centers in Latin America (Costa Rica, Peru, Bolivia, and Colombia). The Encora model is highly collaborative, Agile, English language, same U.S. time-zone, immediately available engineering resources, and economical and quality engineering across the Product Development Lifecycle.
Contact Us